Published by City Farmer, Canada's Office of Urban Agriculture
Neighbourgardens Table Top Garden Bed (TTGB)
Created by Neighbourgardens Society
Vancouver BC
Rae Blewden
Table-Top Garden Beds For People In Wheelchairs
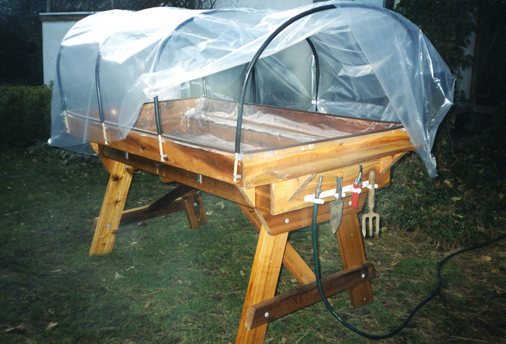
To enable people in wheelchairs to grow their own vegetables Neighbourgardens has designed and built solid cedar Table-Top Garden Beds, 72"Lx40"Wx10" soil base, with specially contoured sides to allow easy wheelchair access from both sides. A portable greenhouse attachment allows for winter gardening and a specially designed drainage system conducts the earth's electro-magnetic energy up into the garden bed to provide the gardener with the same therapeutic value that is normally derived from gardening directly in the ground.
Assembly Instructions
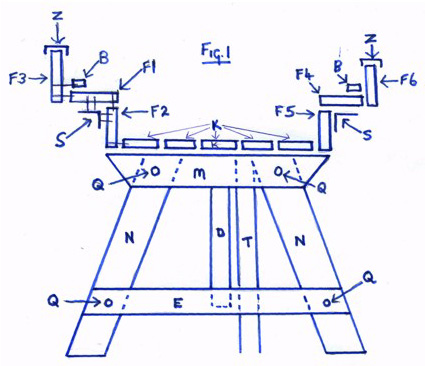
(1) FLOORING. Place the 2 'M' boards short side down, parallel, 61" apart. Place the 5 'K' boards across the top of 'M' boards so that they extend 3 ½" past 'M' boards on both ends. Keep ends of all the 'K' boards exactly even at both ends. Leave ¾" of 'M' board free on both sides of 'K' boards for the sides of the TTGB to sit on (See Fig.1.). Screw all 'K' boards securely to “M' Boards.
(2) Turn this assemblage upside down. Place 'C' board across all 'K' boards at the center point between the 2 'M' boards. 'C' board should be ¾" short on both ends. Screw 'C' firmly into each 'K' board. This completes the TTGB floor.
(3) LEGS. (Steps 3-5 may be assembled last to ensure TTGB exit through a regular doorway.) Place the cut end of an 'N' leg board against the second 'K' board on the inside of the 'M' board so that the leg is protruding outwards beyond the end of the 'M' board. In the center of the segment where the 'N' and 'M' boards overlap drill a ½" hole though both boards. Thread a 'Q' bolt through the holes in both boards from outside to inside, add washer and finger tighten the nut in place. Repeat this step to affix the other 3 legs (See Fig.1.). (Important, table will wiggle if no washers used.)
(4) Place an 'E' board across the outside of the 2 'N' leg boards at one end of the assemblage. Slide it up the 2 'N' legs until the cut ends are even with the outside edge of the 2 'N' legs. In the center of the 2 segments where 'E' and 'N' boards overlap drill ½" holes through both boards. Thread 'Q' bolts through both boards outside to inside, add washers and finger tighten nuts into place. Repeat this step to brace the 2 'N' legs at the other end of the TTGB.
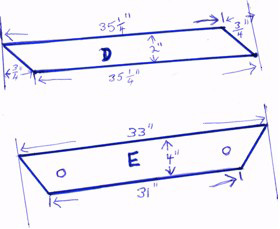
(5) Screw one end of a 'D' board to the center point of 'C' board. Screw the other end of this 'D' board to the center point of 'E' board. Repeat this step with the other 'D' board to brace the other set of legs.
(6) DRAINAGE PIPE. At one end of the TTGB hold the 'T' Downspout against 2nd and 3rd 'K' boards so that it stands upright with the 3" side flush against the inside of both 'M' and 'E' boards, ½" away from 'D' board. Trace a pencil line on 'K' boards around the outside of the downspout, then pencil mark 'E' board with both sides of the downspouts position. Remove the downspout. Screw the 'W' clip to fit between the lines on the inside of 'E' board. Where the pencil marks the downspouts position on the 'K' boards drill 4 ½" holes to form the four round corners. Insert the jig saw blade into one of the holes and proceed to cut all the straight edges of the downspouts rectangular hole through the 'K' board. Turn the whole TTGB assemblage right side up. Sand the cut end of the downspout and around its hole in the 'K' boards to remove any sharp edges that may tear the poly table lining. Thread the downspout down through the opening in the 'K' boards until the other end hits the ground. Push the bottom of the downspout into its clip on 'E' board. The top of the downspout should be ¼" down inside the 'K' board opening (any downspout protruding above the top edge of the 'K' board should be removed with a hot knife.) Using 4 round head ½" screws fasten the downspout to 'K' boards down inside the opening. Jiggle the TTGB to ensure the legs are in correct position then spanner tighten all leg nuts to lock legs securely.
(7) SIDES. Lay an 'F' board (F1) upside down on the workbench. Lay a 'B' board on top so that both 1" sides are flush together (see Fig.1.). Screw these 2 boards together securely all the way along their length.
(8) Place 'F1' on top of another 'F' board (F2) at a right angle, so that the 1" edge of F1 that does not have 'B' board attached is flush with the wrong side of F2 (see Fig.1.) Secure with screws down entire length.
(9) Turn the assemblage over and screw 5 'S' brackets evenly spaced along the length of both F1 and F2 with the end brackets about 6" in from either end (See Fig.1.).
(10) Screw 'F3' board into both F1 and 'B' boards at a right angle, as per Fig.1.
(11) Place the 1" side of 'F2' into the free space at the outside edge of 'M' boards (See Fig.1). Screw 'F2' securely to the outside 'K' board to form the first side of the TTGB. Repeat steps 7 to 11 for form the other side of the TTGB.
(12) SHELF. Screw 2 'S' brackets to the back side of 'J' board 3" in from either end, with right angles flush with the 1" edge.
(13) END SIDES. Lay one 'G' and one 'H' board beside each other, faces down, with 1" sides together, and 'H' board centered on 'G' board. Cover the join of 'G' and 'H' evenly with an 'A' board. With 2 rows of 1 ½" screws attach 'A' to both 'G' and 'H' boards making sure to keep the joint of 'G' and 'H' boards closed tight (See Fig.2). Repeat this step to make other end side.
(14) Take the 'J' shelf (from step 12 above) and center it on the 'G' board of one side end (from step 13 above) with the 'S' brackets lying across the joint of 'G' and 'H'. Screw the brackets into both 'G' and 'H' boards where the screws do not conflict with those from 'A' board. If needed, to further secure the shelf add a few more screws through 'G' into 'J' board. Repeat this step for other end shelf.
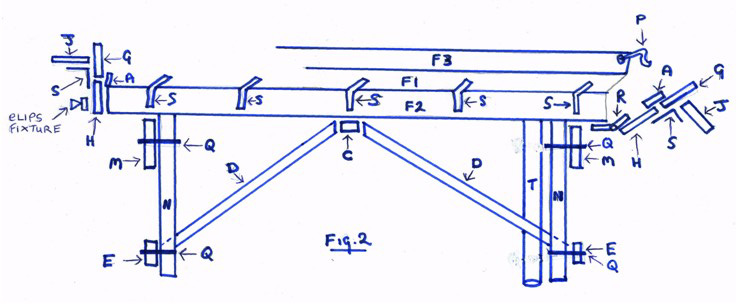
(15) Fix one end/shelf assemblage to the TTGB at the opposite end to the drainage pipe. Screw 'H' board to 'F2', 'F5' and all the 'K' boards. Screw 'G' board to 'F1', 'B', 'F3', 'F4', 'B', and 'F6'. Fix the Spring Clip Track Fixture to 'H' board centered below the shelf. You now have 3 sides complete.
(16) Screw the 4 'P' hinges to the underside of the 'K' board ends at the drainpipe end of the TTGB, evenly spaced apart. Screw the other side of these hinges along the inside of the 'H' board to allow the end assembly easy movement from the closed position to a fully dropped down position for emptying and replacing soil.
(17) Using 2 pair of pliers, bend the long necks of the 'S' gate hooks to reach around the corner of the TTGB. Remember to bend two left and two right. Screw 1 hook into either end of 'G' board and 1 into either end of 'H' board about 2" in from the edge. Then screw 1 eye into F2, F3, F5 and F6 to correspond with the reach of the gate hooks.
(18) Spread the Heavy Duty Polyethylene Sheeting (poly) to line the inside of the TTGB. Work carefully to avoid creating any holes in the poly. Start at the fixed end of the TTGB opposite the drainpipe. Push the poly into all the corners and right angle joints, weighting it in place with heavy books or suchlike to hold its position without stress. While folding it into the corners, run the poly up the sides and over the top edge of the TTGB, then fix into position with the 'Z' vinyl moldings over the top of both the poly and 'F3', 'G' and 'F6' boards. Do not allow any stress areas. Gather some extra poly around the drainpipe hole, poke it down the throat about 4", cut slits in the poly to allow a snug opening against the inside of the drainpipe. Do not allow slits in the poly above the top of the drainpipe or moisture will enter and rot the surrounding woodwork. Fold the poly down the open end and secure with 'Z' vinyl molding in the open end position. Check there is no stress on the poly. Cut off any excess poly sticking outside the 'Z' vinyl molding. Congratulations! Your Table Top Garden Bed is now complete and ready to fill with good healthy compost and soil to grow your plants in.
Greenhouse Attachment
A. 16 of ¾" Electrical Cable Straps
B. 8 of ½" Electrical Staples
C. 8 of 3/8" x 12" round wooden doweling.
D. 4 of ½" x 72" Polyethylene Tubing.
E. 6 Bull-dog clips.
1 108"x 84" Heavy Duty Clear Poly Sheeting.
Screw an 'A' strap into 'F3' about 2" in from the end and 1" down from the top edge. Screw another 'A' strap about 3 ½" directly below it, and then tap one 'B' staple in about ½" directly below the bottom strap. Now slide a 'C' dowel down through the 2 straps to sit comfortably on top of the staple. Repeat this step at the other end of 'F3', then twice more evenly spaced between the two. Repeat again along 'F6'. Slide a 'D' tube over the top of each dowel along one side of the TTGB. Now slide the other end of each of those tubes over the corresponding dowel on the other side of the TTGB. Spread the poly sheeting evenly over the top of all the ribbing tubes. Use 4 Bull-dog clips to fix the poly to the top of each tube ribs to prevent removal via wind. Bunch the poly together at each end and secure to the end shelves with a Bull-dog clip.
Lumber List: Cedar
A 2 of 2" x 1" x 26" Inside End
B 2 of 2" x 1" x 72" Inside Length
C 1 of 2" x 2" x 29" Under Brace
D 2 x 2" x 4" x 36" Under Supports
E 2 of 2" x 4" x 33" Bottom Leg Brace
F 6 of 6" x 1" x 72" Bed Sides
G 2 of 6" x 1" x 40 ½ “ Bed Top End
H 2 of 6" x 1" z 29" Bed Bottom End
J 2 of 6" x 1" x 36" (shelf)
K 5 of 6" x 2" x 72" Bed Bottom
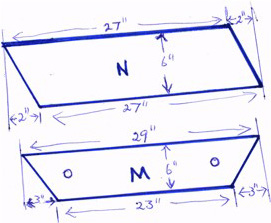
M 2 of 6" x 2" 29" Bed Leg Brace
N 4 of 6" x 2" x 30" (legs)
Hardware List:
P 4 of 4" Gate hook and eye sets.
Q 8 of 7/16" x 4 Bolt, nut and washers.
R 4 of 2" Broad Utility Hinges.
S 14 of 4" Right Angle Corner Braces.
T 1 of 2" x 3" x 26" Brown vinyl downspout.
W 1 of Brown vinyl downspout clip.
Z 2 of 1" x 72" Brown vinly molding. 2 of 1 x 40" Brown vinly molding.
1 of 108" x 96" Heavy Duty Clear Polyethylene Sheeting
5 Adjustable Spring Clip Track Fixture.
Note: Entire table should be constructed with 3", 1½", 1¼", and ½" Screws.
Search Our Site
![[new]](new01.gif)
